We integrated PLASMA Lab and MATLAB/Simulink. The idea of this integration is to let MATLAB/Simulink run a model and produce sample traces. These samples are then be sent to PLASMA Lab in order to check them. See the PLASMA Lab architecture explanation to understand how this is possible.
We provide two different ways of using this feature:
- Use PLASMA Lab SMC algorithms from within MATLAB
- Launch a MATLAB session from the PLASMA Lab user interface
From MATLAB/Simulink
This MatLab App allows you to choose a Simulink model and test a B-LTL property on it using on of our three SMC algorithms (Monte Carlo, Chernoff and Sequential).

PLASMA2Simulink MatLab App
How to install and use this App?
- Requirements: This App was tested with MATLAB R2013a and R2013b, under Windows7 and Fedora 19.
- Installation: Download PLASMA2Simulink App (latest version is 1.2.20 accessible here) and install it in MATLAB (Click on “Install App” in the tab “APPS”) . The installer should add a PLASMA2Simulink icon in the category “My APPS”.

- Launch the App.
- Choose a Simulink model, write your B-LTL requirement and choose your algorithm.
Algorithm parameters are separated by spaces and are given following the order as in the PLASMA Lab tutorial. - You are now set up, click on the “Go !” button to launch the experiment.
See How does it work ? below for further details.
From PLASMA Lab
Since PLASMA Lab v1.2.6, you can download the MATLAB/Simulink PLASMA Lab plugin and run it from PLASMA Lab. This plugin will allow you to:
- Run a Simulink model from within PLASMA Lab
- Check a property on this model
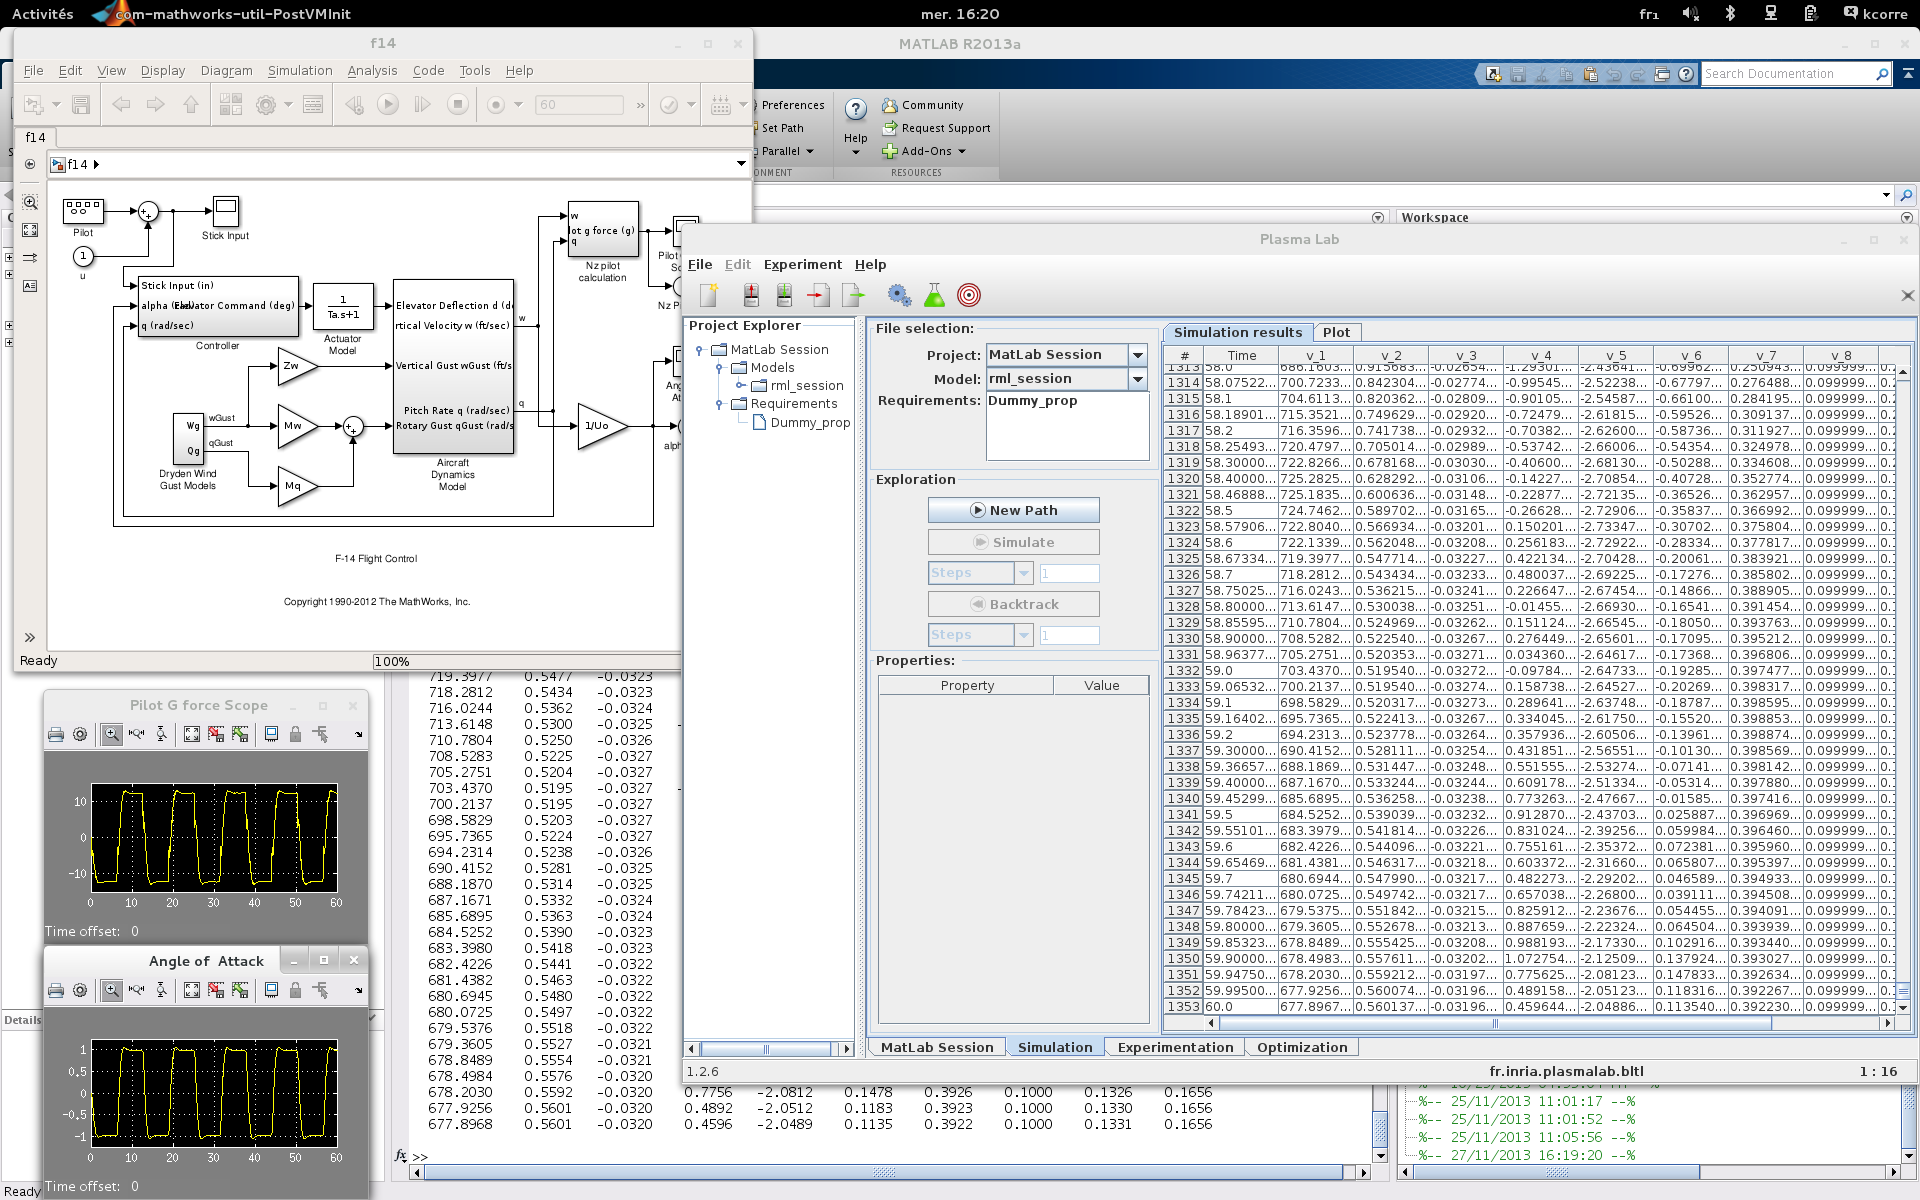
PLASMA Lab and MATLAB/Simuling running together
How to install and use this plugin? (this was only tested on Linux)
- Requirements: PLASMA Lab v1.2.6 or superior, a MATLAB/Simulink installation accessible from the command line.
- Install the MATLAB/Simulink plugin (accessible here) following the instruction plugin installation. Or download the latest PLASMA Lab bundle already including MATLAB/Simulink plugin — [tar.gz] — [zip].
- Run PLASMA Lab. If you are running PLASMA Lab from a terminal you should see a line indicating that the MATLAB/Simulink model has been loaded. You can also see this by checking the information in the Help>About PLASMA Lab menu.
- Create a new model for your project, and choose the MATLAB/Simulink plugin as the type of the model. As the model compile for the first time, MATLAB/Simulink should launch itself and load the ‘F14’ model. It may take some time. Alternatively you can download a PLASMA Lab project file already set here.
- You are now set up and can use PLASMA Lab simulator or experiment mode.
Configuration of Simulink models and examples
Any Simulink model can be used by PLASMA Lab. However to provide significant results the models should present true random behaviors. This is not possible using on the shelf Simulink blocks, as random sequences generated in these blocks are always the same at each simulation. We therefore advice to include C code functions using the S-Function builder block.
B-LTL requirement can be written using the standard syntax used by PLASMA Lab. The variables used in these requirements must be variables logged by Simulink. To log a signal apply the following steps:
- Select a link in the Simulink model and right click on properties.
- Give a name to the signal.
- Check the box “Log signal data” under the tab “Logging and accessibility”
We provide two examples that can be used with PLASMA Lab:
How does it work?
PLASMA Lab itself connect to MATLAB via the MatlabProxy class from the matlabcontrol project. The MATLAB/Simulink session then retrieves the content of the PLASMA Lab model panel and uses this String to make call to Matlab.
These calls are equivalent to the following MATLAB code:
- open_system(‘content‘)
- [timeVector,stateVector,outputVector] = sim(‘”+content+”‘);
In order to open and execute a Simulink model, replace content by the text (model name or path) you would use in MATLAB.
Retrieving the execution trace: for now, we retrieve the model execution trace as an 2D array, each column representing a variable and its values for each step. Each variables are given name using their column index to identify them starting from 1. ie: to identify the first column, use the variable name v_1.
Execute [timeVector,stateVector,outputVector] = sim(modelName) in MATLAB to see the stateVector used by PLASMA Lab.
Warning!
FAQ
Opening or creating a new MATLAB Session model throw an error in MATLAB. This error is related to MatLabControl, the library used to interface PLASMA Lab and MATLAB. http://code.google.com/p/matlabcontrol/issues/detail?id=12 It means that if you restart PLASMA Lab you will not be able to use the same MATLAB Session, a new one will be created.
Java WebStart: The MATLAB/Simulink plugin is not available from our PLASMA Lab WebStart distribution since JavaWS forbid to run external application from it. Be sure to choose the Download method to use it.